Aonpos todo en una posición
  • What is the Fundamental Difference Between a Self-Service Machine and a POS System?
    What is the Fundamental Difference Between a Self-Service Machine and a POS System? Dec 08, 2025
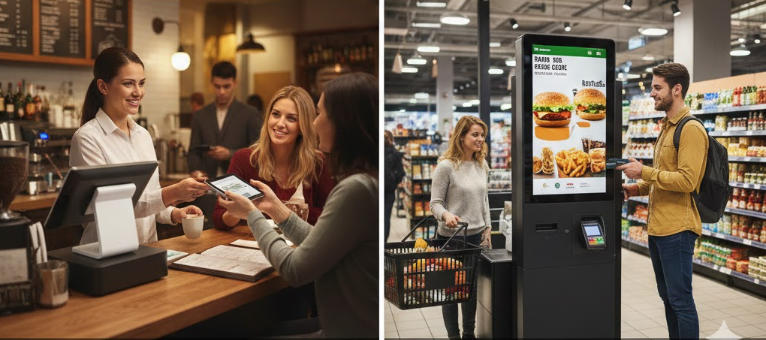
    The distinction between a Point of Sale (POS) machine and a Self-Service Machine (often called a kiosk) centers on who is operating the device and its primary operational role within the business. The POS System is the comprehensive, staff-operated central hub for sales, business management, and reporting. The Self-Service Machine is a customer-facing terminal designed specifically to streamline the ordering, scanning, and payment processes, reducing the need for direct staff involvement in every transaction. Defining the Core Components Achieving a high ranking requires defining the terms clearly for both Google and the reader. 1. What is a POS (Point of Sale) System? A POS system is a combination of hardware and software used by a business to finalize transactions. Crucially, it serves as the central nervous system for the entire operation. Primary User: Trained staff or cashier. Role: Comprehensive financial management, order entry, employee clock-in/out, inventory tracking, and running detailed sales reports (e.g., daily sales, best-selling items, labor costs). Location: Usually behind the counter, server station, or fixed service point. 2. What is a Self-Service Machine (Kiosk)? A self-service machine or kiosk is a dedicated, public-facing terminal designed for quick, independent customer interaction. Primary User: The customer. Role: Facilitating fast order placement, product scanning, and payment completion, shifting the burden of data entry from the employee to the consumer. Location: High-traffic customer areas like store entrances, dining halls, or waiting areas. A Side-by-Side Comparison of Features and Hardware To cement the comparison, here is a detailed breakdown of how the two technologies differ in practice. Feature Category POS Machine (Staff-Operated) Self-Service Kiosk (Customer-Operated) Operational Scope Comprehensive. Manages refunds, complex discounts, loyalty programs, staff permissions, and back-office reports. Transactional. Focuses purely on product selection, customization, and payment processing. System Interface Designed for staff efficiency, often featuring complex menus and detailed inputs for inventory management. Designed for User Experience (UX), featuring large buttons, clear visuals, and intuitive guided workflows. Hardware Smaller touchscreen monitor, cash drawer, dedicated receipt printer, magnetic card reader, optional handheld scanner. Large, durable, tamper-resistant touchscreen display, built-in payment terminal, dedicated stand/enclosure. Connectivity Deeply integrated with back-office software (inventory, labor, accounting). Primarily integrated with the Kitchen Display System (KDS) or order fulfillment queue. Cost Lower initial hardware cost, but tied to comprehensive software licenses. Higher initial hardware cost (due to size and durability) but potentially lower long-term labor costs. When to Use Which System: Ideal Applications Deciding which system to invest in depends entirely on your business model and operational goals. When to Prioritize the POS Machine The POS machine is indispensable when transactions require human judgment and intervention. Full-Service Restaurants: For managing complex table service, splitting checks, serving alcohol (age verification), and handling server tips. Specialized Retail (e.g., Jewelry, Electronics): When sales involve extensive product knowledge, upselling guided by staff, or handling high-value security requirements. Service-Based Businesses (e.g., Salons, Repair Shops): Used for booking appointments, managing client histories, and processing service-based invoices. When to Implement a Self-Service Kiosk Kiosks are a powerful tool for streamlining high-volume, repetitive processes. Quick-Service Restaurants (QSR) & Fast Casual: Reduces queues, allows customers to customize orders perfectly, and boosts average order value (AOV) through automated upsells. Retail Groceries & Pharmacies: Provides a quick checkout option for customers with a few items (self-checkout). Entertainment & Travel: Used for ticket purchasing, printing boarding passes, or checking into hotels. Business Impact: A well-placed kiosk can significantly reduce labor costs and increase order accuracy, while the POS machine remains vital for inventory control and detailed financial auditing. Which System is Right for Your Business? A successful modern business often requires both systems working in harmony. To determine your priority, consider the following: Do you require staff to manage inventory and labor? POS System is essential. Is your business high-volume and order accuracy critical? Self-Service Kiosk is a high-value investment. Do you want staff to focus on customer service instead of data entry? A combination is best. Use kiosks for ordering, and POS systems for exceptions (returns, large orders, staff overrides).
  • What should I do if the self-service machine's camera cannot recognize my identification document?
    What should I do if the self-service machine's camera cannot recognize my identification document? Dec 11, 2025
    Encountering an "ID not recognized" error at a self-service machine can be frustrating. These kiosks rely on highly sensitive cameras to verify the security features and machine-readable zones on your identification document. In most cases, the issue is environmental, not electronic. Before calling for assistance, follow this comprehensive, step-by-step guide to quickly troubleshoot and fix common ID scanning failures. 1. Immediate Steps: Fix the Environment and Positioning Follow these quick steps, as glare and smudges account for over 80% of self-service machine scanning errors. Step 1: Check the Document and Scanner Lens The camera cannot read what it cannot see clearly. Clean Your ID: Use a soft, dry cloth or tissue to gently wipe the entire surface of your identification (e.g., driver's license, passport card). Pay special attention to the photo area and the machine-readable code, as fingerprints cause reflection (glare). Wipe the Scanner: If safe and accessible, use a clean cloth to gently wipe the glass or plastic cover over the machine's camera/scanner lens. Dust and residue easily collect here. Step 2: Eliminate Glare and Adjust Positioning Ambient light interference is a major cause of document scanner errors. Shield from Light: If the kiosk is near a window or bright overhead light, use your body or hand to cast a shadow over the ID while it is on the scanning bed. Direct light creates bright spots that obscure holographic security features. Ensure Flatness: Place the ID completely flat against the scanning surface. If the card is warped or bent, the camera struggles to focus evenly across the entire document. Center the Scan: Ensure the document is perfectly centered and aligned within the designated white guides or outline on the scanner bed. Hold Still: Once placed, keep your hands clear and ensure the ID remains absolutely still for the duration of the scan (usually 3–5 seconds). Movement results in a blurred image. 2. Document-Specific Troubleshooting Sometimes, the issue lies with the physical condition or type of document itself. Damaged/Worn IDs: If your laminated ID is peeling, heavily scratched, or the plastic film is separating, the damage may be distorting the data, leading to a permanent ID verification failure. You may need to use an alternate, undamaged document. Temporary Paper IDs: If you are using a temporary paper ID, it must be completely flat. If the edges lift, gently hold them down during the scan without covering the data. Paper documents are susceptible to folding or bending, which the scanner interprets as damage. Unsupported Documents: Ensure you are using an accepted form of ID. For instance, the machine may only be programmed to recognize the standard size and format of a State Driver's License and might not accept documents like a library card or a foreign work permit. 3. Escalation and Getting Assistance If you have tried the steps above and the machine still cannot read your identification, you need to call for help. Action Goal Detail Retry Once Rule out a simple software glitch. If the machine prompts "Try Again," attempt one final scan after confirming the document is clean and flat. Note the Machine ID Expedite technician support. Locate the unique identifier (e.g., APK06 or APK02) usually displayed prominently on the screen or body of the kiosk. Provide this number when you call. Call for On-Site Help Resolve the hardware failure. Use the dedicated "Call for Assistance" button on the machine for immediate support. The machine may require a remote reset. Key Takeaway: If the machine fails consistently, the camera itself may be misaligned or dirty internally. Providing the support staff with the Machine ID is the fastest way to get the problem fixed.

¿Necesitas ayuda? Habla con nosotros

dejar un mensaje
Para cualquier solicitud de información o soporte técnico, rellene el formulario. Todos los campos marcados con asterisco* son obligatorios.
entregar

Hogar

productos

whatsApp

contacto